By Brian Carroll
As I said in the first installment of this series—“How to Squat”—I’m not writing these pieces with beginners in mind. It’s important to note, however, that squatting is squatting—and in this case, deadlifting is deadlifting—so the technical points I’ll be making here will apply to you whether you’re struggling to pull 135 pounds or gunning for 1000 at next year’s Arnold Classic.
The people I have in mind as I write this are intermediate gym rats. Maybe you’ve just nailed 365 and your next step up the ladder is 405—or maybe you’ve hit your 405 and you want to move your max up past that gold-standard 500 pound mark. Either way, I’ll walk you through the entire process here—from the time you start warming up to the point where you’re standing tall, locking the bar out, hoping someone in the gym will notice the all-time personal record (PR) you’ve just pulled.
Warming Up
Start your deadlift workouts by getting some blood flowing and working up a little sweat, either on a bike or a treadmill. Your posterior chain is the prime mover of the deadlift, so get your hamstrings as warm as possible. I do this with hamstring curls, hyperextensions—if your gym has a reverse hyper, use it—and anything else that gets blood to my lower back and hamstrings. The key is finding movements that stretch these muscles out and provide some kind of traction.
Then, move to the area where you’ll be deadlifting. Start with the bar and perform two or three sets of 10-15 deadlifts—including a set of stiff-legged deadlifts where you’re simply hinging up and down to stretch out your lower back. When you’re ready to add weight—assuming, again, that you’re an intermediate lifter—put 135 pounds on the floor and do 5-6 reps, followed by the same number with 185. If you’re a 400-500 pound deadlifter, use 50 pound jumps when you’re building up to your working sets. Once you’re near 50 percent of your max, drop your reps and perform triples.
Lining it Up
I prefer to line up with my shins about an inch and a half from the bar. This will vary depending on the size ratio between your tibia and fibula and your femurs. If you have very long lower legs, you’ll need to move further away from the bar, because when you go to drop your hips and bend your knees, you’ll end up way out over the bar—and your knees will be in the way. Your initial distance from the bar is dependent upon your leverages, but it’s important to get this right. For every unnecessary inch or two you give up, you can cost yourself as much as 25-50 pounds worth of effort when you’re pulling heavy.
 Once my distance is set—I’ll cover foot position in a moment—I’ll set my hands, one at a time, on the bar. First, I set my “over” hand and lock it in. Then, I’ll set the hand that’s “under” by making a twisting motion as though I’m riding a motorcycle. This ensures that both sides are turned in place and as locked in as possible.
My hips, at this point, are nice and low, I don’t want this to look like a regular squat, though. It actually looks more like the position you’d be in on a power squat machine, with your head looking down at the bar to make sure your feet are lined up properly. Here, you’ll want to make sure your toes are angled out slightly. The width of your stance will depend on your build, but a good starting point would be to have your feet slightly closer than shoulder width apart, with your toes angled out approximately two inches.
To Sumo or Not to Sumo
I’ve seen lifters of all shapes and sizes deadlift successfully using the sumo style, but whether you’ll want to lift this way depends on how smoothly or naturally you’re able to do it. I pulled sumo for a long time, but I came to a point where my leverages for it were no longer very good. I started developing much thicker legs and a thicker midsection, so it no longer worked as well for me. Ironically, however, every time I switched back and forth between styles, I ended up pulling a PR.
If you do try pulling sumo, you’ll need to be very patient off the floor, because it’s more of a finesse lift than the conventional style is. You can have ugly form pulling conventionally and still “muscle” the weight up, but you won’t be able to do this as easily with sumo deadlifting. The latter involves about 75 percent legs and 25 percent back—which entails some serious skill when loads get extremely heavy—whereas conventional deadlifting is more of a 50-50 proposition.
Your Grip
If you’re deadlifting conventionally, line up with your hands slightly inside shoulder width. For guidance here, this would put your hands at the start of the bar’s knurling—or possibly about a half inch outside of it.
When you start working with heavy loads, you’ll need to use an over-under grip. I like to do this with my strong hand over and my weak hand under—but I’d recommend becoming proficient at deadlifting with both your weak hand over and your weak hand under. If you constantly train with the same over-under grip, this can lead to developmental issues in your lats and in your spinal erectors.
There’s a slight difference, even if it’s just a matter of millimeters, between an overhand and an underhand grip. On the under side, your arm draws up a little bit since your elbow is in a different position. This will change your range of motion ever-so-slightly. This difference may be miniscule, but if you’re pulling with an asymmetrical range of motion on each side for long enough, this can lead to imbalances.
One thing I like to do is to flex my triceps when I’m about to start my pull. The triceps are essentially the antagonist muscle here, so you want to straighten them out so your biceps are tight, but not flexed. This will keep you from trying to curl the bar up at lockout—a mistake that can lead to a painful bicep tear.
Time at the Bottom
I’ve heard people say that staying too low for too long, adjusting your grip before you deadlift, can take away strength. This, to me, is highly subjective. I’ve seen some lifters with really big hands who don’t even have to set their grip. Orlando Green comes to mind immediately here. Google him and watch how he deadlifts. He doesn’t set his grip at all. Instead, he just bends his waist slightly, lowers his hips, puts his hands on the bar, and pulls. It’s almost as though he’s snatching the bar off the floor.
 When you have hands as big as catcher’s mitts, you can do this. Guys like Orlando have hands that are so big and strong that setting their grip doesn’t matter. When you have smaller hands, however, you have to pay a lot more attention to setting your grip. You don’t want to stay down and fiddle with your hands for three minutes, but it’s important to make sure everything is locked in properly before you drop your hips and go.
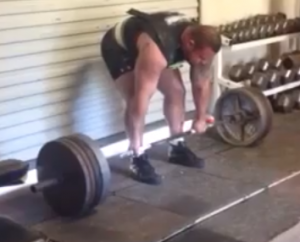
The Approach
First, make sure you understand what type of surface you’re lifting on. If it’s a rubber gym floor, you’ll tend to track dirt on the bottoms of your shoes, so use a moist towel to wipe them off so they’ll stick to the floor better. One of the first things you’ll need to do when you start your pull is to drive your heels through the floor, and you’ll need very good traction to do this properly.
I stop about three or four feet from the bar and stomp my feet to make sure I have this traction. At this point, I’m visualizing—seeing the lift before it happens. What I want to think about here is keeping the bar close into me and not letting it drift outward. I visualize it coming straight up and back, with a smooth, fast lockout.
The Pull
Now we’ve come to the payoff. As I’m setting my grip, my legs are straight. From here, I’ll drop my hips down, putting tension on the bar so my hips come to that “power squat” position. I’ll then rock back, drop my ass down, throw my head back, and drive my weight into my heels—and not the bottoms of my feet or my toes. This works the same way with the deadlift as it does with the squat—you drive into your heels, activating your glutes and hamstrings.
This motion turns the deadlift into a sort of standing leg press. Think of this as a fairly violent movement, where you slam your heels into the ground, throw your head straight back, and push your hips through in one smooth motion. When you throw your head back, this will raise your chest and put your weight on your heels—which, in turn, will keep the path of the bar close to your body.
Moving Toward Lockout
When the bar begins to break contact with the ground, you’ll have a lot of involvement from your quads, so the idea is to feel as though you’re firing your quads through the bar as it’s coming up your shins. As it starts to pass your knees, throw your head back even further. At this point, as the bar begins to slow down, squeeze your glutes as hard as you can and push your hips through the bar.
When I’m in this position, my head is back and up, my arms are relaxed—but my grip is strong—and I’m squeezing the hell out of my glutes. Think about this for a minute. Squeeze your glutes, hard, as you’re reading this. What happens when you do this? Your hips move forward naturally as you squeeze. This movement is what’s going to guide the bar powerfully into a locked out position at the top of the lift.
 The key to this move is to get your hips into the most advantageous position possible to exploit your leg drive. Think of this as “humping the bar.” Whenever I miss a deadlift, it’s usually because my legs are fatigued, and I’m not getting that rocket boost out of the bottom from my quads and hamstrings. When you’re in that situation—in the last set of a heavy session, for example—you’ll tend to want to straighten your body out and “stiff” it up. Don’t do this. Load your legs up and get as much speed off the floor as you can, so you’ll have the momentum to pull through it at the top. This takes patience, so tell yourself not to panic. Ride it out and push your hips through without straightening up or trying to curl the bar with your arms.
The Roll-Out/Roll-Up
Some world-class deadlifters like to roll the bar out, then roll it back to their shins. I’m not a fan of this for the average gym rat—especially when you’re using flat plates that will roll back to you crookedly. Powerlifter Garry Frank did this successfully for a long time, but it’s not for everyone.
The roll-up is done as a timing mechanism, and there can be advantages to it if it works for you. You roll the bar out, then roll it back and drop your hips when it’s about an inch from your shins. I don’t have a problem with this, per se, but it’s not something I would either teach or recommend for beginner or intermediate lifters.
Your Belt
When you deadlift with a belt, the idea is to wear it a little bit higher than you would when you squat. Instead of sitting the belt on top of your hips, set it up around your middle or upper abs.
My belt-wearing philosophy for deadlifting is the same as it is for squatting. Wear your belt for your first working set of the day—which generally means putting it on for anything over 50 percent. This is where we want our working sets to lead to competition lifts—or simple one-rep maxes if you’re just trying to get stronger—so you’ll want to practice how you play, keeping conditions similar to what they’ll be when you’re performing your heaviest sets.
Footwear
For deadlifting shoes, the thinner the sole, the better off you’ll be—as long as you’re getting at least minimal foot support. I know some lifters who like to deadlift in ballet slippers. These give you no foot support whatsoever, but they minimize the distance you’ll need to pull the bar to lockout.
I’ve said previously that I don’t like Chuck Taylors for squatting, but when you deadlift, there’s not as much pressure on your feet. You’re only doing a few reps, you don’t have to walk the bar out like you do with a squat, and the weight isn’t sitting on your back. If you want to deadlift in Chucks, they’re an acceptable choice—along with Asics wrestling shoes, which I’ll also use frequently.
How to Train It
My basic deadlift template for intermediate lifters involves a 5×3 (five sets of three) foundation. This works along the same lines as the 5×5 plan I outlined for the squat. You can switch this up some weeks and lift for heavier doubles, or you can do 4×3 and use your fifth set to try for a new max.
 The one dynamic that comes into play with the deadlift is grip strength. If you’re into your fifth set of triples, your grip might start to fail on your last set. When this happens, there are two things you can do. First, you can simply do three singles, standing up and resetting after every lift. Next, although I don’t recommend using straps, you can wear them to finish up. This would only happen with your last set, though. If you work your way up using straps for every set, you’ll massively hinder your grip strength development.
Assistance Exercises
Elevated Stiff-Leg Deadlift: This is my all-time favorite, and I do them standing on a 2.5 inch block, working without a belt. I’ll work for two sets of five, using my hamstrings and glutes to explode off the floor and power through to lockout.
Block Pulls: Do these from 4-6 inch blocks, so you’re pulling the bar for less of a distance. The starting position of the bar should be from your upper shin to about knee level, and from here, you’ll pull to lockout. I like these better than rack pulls—done from the spotter bars of a power rack—because the block pull better simulates pulling from the floor. When you pull in the rack, you don’t have any “bar whip” at the bottom of the lift, and it’s an entirely different feel that’s not as useful.
Opposite Stance Deadlifting: If you’re a conventional deadlifter, work in some sumo deadlifts for high reps. You can do this touch-and-go style, or you can pause at the bottom.
Finally, do plenty of pull-ups, lat pulldowns, hamstring curls, glute-ham raises, pull-throughs with bands or cables, and a solid regimen of abdominal work.


Recent Comments