By Caroline Gick
It’s amazing to think I’m just two weeks away from getting on stage. The past two and a half months have gone by quickly, and I’m feeling confident that I’ll be ready by May 11th, the day of my show.
My training has been going well, the tweaks I’ve made over the past few weeks are starting to yield results, and I’ve been really diligent about following my meal plans and getting all my training sessions in. With Carb Nite, I don’t have to make any drastic changes or cuts as I get closer to the show.
That’s one of the things I love about this plan. With the exception of some minor alterations, my diet is pretty much the same for the entire 13-week period, which means my mood doesn’t change over the last few weeks as a result of some big change in calories or carbs. I don’t get “hangry” or foggy. What I do get, however, is nervous.
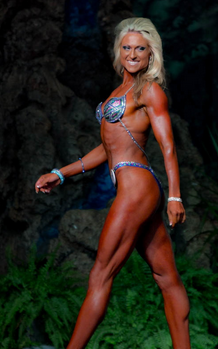
I’m a worrier by nature. With two weeks to go, this part of my personality has the potential to ruin the enjoyable experience I’ve had thus far. I worry that my legs won’t be where I need them to be, that my face will look drawn and unattractive, that my suit won’t look good, and that my posing will be off. You name it, and I’ll worry about it.
In the past, this level of anxiety has taken me to the point where I haven’t enjoyed the actual day of competition at all. Sure, I’m bound to experience some nerves, but this should be a celebration—time to show off all the work I’ve been doing. My past two shows weren’t like that, though. They were filled with angst, dread, and discomfort.
Not this time. This year, I’ve intentionally kept expectations out of the equation. We all like to win and be rewarded for our hard work, but that’s not my goal for this competition. My real “end” here has been to get myself into competition shape, and to share the experience with others—both as a way to motive myself, and to help anyone who’s interested. I’ve achieved both of these goals already, so what’s left?
To get on stage and have fun.
One of the most anxiety-ridden and frustrating parts of preparing for the stage has always been posing—and I’ve heard the same from many first-time competitors. They don’t know what they need to know, they’re not sure they’re doing it right, and they don’t know where to go for help.
If you have the means and the connections, it helps to hire a posing coach or attend a posing workshop. If you hire a coach, choose someone who is—or has been—an actual competitor, with intimate knowledge of the type of posing you need, i.e., a bikini coach for bikini competitors, and a figure coach for figure competitors.
If you don’t have a posing coach, don’t stress out over it. There’s still a lot you can do and learn on your own. I met with a posing coach for one hour before my first show. Since that point, I’ve read a lot, paid attention to competitors at other shows, and watched hundreds of YouTube videos—some of professionals on stage, and others with professionals leading workshops and coaching competitors. My favorites to watch are Erin Stern and Nicole Wilkins. Beyond that, it’s time spent in heels and time in front of the mirror, hitting poses over and over until I get them right.
Here’s a look at what I’ve learned so far:
Figure Posing 101
YOUR TIME ON STAGE – THE INDIVIDUAL ROUND
The Walk
 One of the most basic things to practice is walking in your heels. I like dresses, heels, and girly things, so I feel pretty good about my gait, but it’s still really important to practice. Your heels will be at least 4” high—higher than normal work heels. You’ll also be walking on a stage that can be pretty slippery, so the more comfortable and confident you feel in your shoes, the better off you’ll be.
- Stand tall.
- Shoulders back.
- Swing arms gently.
- Walk heel/toe, heel/toe – no clomping along flat-footed.
- Exaggerate your hip swing – don’t be straight and stiff.
- Remember, the judges are going to see you walk toward them and away, so you need to always be conscious of your movement, front and back and from the side.
To get a sense of what the stage floor might feel like, wear your heels to the grocery store and practice your walk up and down the aisles. These floors will be more slippery than the ones in your house or apartment. It’s a little weird, but it works.
Casual Model Pose
In some cases, you’ll have the opportunity to stop in the middle of the stage to strike a quick, “Hey, look at me!” pose. This may not always happen, but it’s good to be prepared. There are almost always TV screens backstage where you can follow the show, so watch what others are doing before you. If this is something you can do, strike a quick, casual model pose. It’s a great way to make an entry that shows your ease, confidence, and some of the nice lines of your physique.
- Cock your hip to one side.
- Put your arm on your cocked hip.
- Extend your other arm down and out to the side
- Extend your other leg out to the side.
Once you’ve struck this pose (if you can), you’ll head down to the judges for your series of individual poses. There will be an X or a box taped to the floor to show where you need to be. Keep your walk even and flowing. There will likely be loud hip-hop or pop music playing. I find this very helpful in keeping my pace and pumping up my energy and my smile. Keep your eyes up (not on the floor), and engage with the judges.
As soon as you get to your mark, go right into your front pose. You’ll often be given a certain amount of time to hit all your poses. This is usually not much, so make the most of every second. Think about this beforehand. If you’re given 45 seconds, and you’re doing four poses, get into position, count to four, then make your transition.
Front Pose
In your front pose:
- Flare your lats.
- Keep your shoulders down and back, and let your arms hang a few inches in front of you, with the bottom half of your arms hanging loosely.
- Keep your legs together with your toes about ¼ – ½” apart, to show the front of your legs and your quads.
- Stand tall.
- Stomach in but not sucked in.
- Hold everything tight.
One of the most common things I’ve seen is when competitors pull their shoulders up to their ears with their arms extended too widely and stiffly at their sides. There are two ways I combat this:
- Once you’ve inhaled and flared your lats, take a deep breath out and ease your shoulders down.
- Move your arms to hang slightly in front of your body, rather than to the side.
Side Model Pose
In your individual posing, you’ll be doing model poses to highlight your physique on your side poses. There are different ways to transition into these poses. Watch lots of videos of the pros and other shows for ideas to practice. Take the time to figure out what works best for you.
- I like to step back with my right leg and bring my left leg back to meet it, then bend the left leg.
- Keep your left foot pointing slightly to the front and press your legs together to make your left hamstring pop.
- Flare your lats.
- Put your back arm on your hip.
- Keep your front arm extended downward, hanging loosely from the shoulder down.
- Twist your upper body so it’s facing the judges.
- Stand tall, with your shoulders down and your back and stomach in.
- Tighten your legs and pop your butt.
 I can see a huge difference in my midsection—mostly in my glutes and hips—when I focus and keep everything tight. In my mind, I say “Tall and Tight” over and over again as I’m moving into the pose.
Back Pose
I love the back pose, mostly because it’s a chance to stop smiling and relax my face!
- If you have long hair, pull it to one side as you move into the pose so the judges can see all of your back.
- Flare your lats.
- Keep your shoulders down and back. This will help all your back muscles be more defined, and it’ll make your rear delts pop.
- Hold your arms slightly in front of you rather than out to the side.
- Legs together, feet ¼ – ½” apart.
- Pop your butt to the point where it feels pretty uncomfortable.
- Hold your legs super-tight.
I used to practice with my hair pulled up, but now I keep it down so I can simulate the stage experience exactly every time. When I get there, I don’t have to think about anything. I just do what I’ve been doing.
If you’re new to competing it may take some practice to learn how to flare your lats. Relax, then hug yourself, expanding your back. Keep your back in this position, and let your arms loose. From there , you just have to get used to this feel, practicing it over and over again until you can hit it without thinking about it.
From here, if you have time to hit a fourth pose, transition into the model pose on your other side. Sometimes you’ll only have time to hit three poses, so you’ll want to do front, back, and whichever side feels the most comfortable.
Saying Goodbye
Before you head to the side of the stage, give a quick curtsy and a wave to the judges and the crowd. As you walk back to the side to join the line of girls, you’re still being watched. Keep everything tight, keep your eyes on the judges for as long as you can, move into line, and ease into your pose there gracefully.
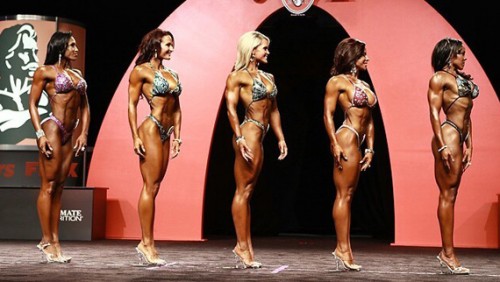
COMPARISON ROUND
Once all the girls have done their individual poses, the judges will usually call down groups of five. Again, you’ll be hitting four different poses—front, back, and two side poses. You’ll be given instructions by the judges to “quarter turn to the right” when it’s time to move into each.
Once you’re called to the line, hit your front pose immediately and hold it until the judges direct you to do your quarter turns. Your front and back poses will be the same as described above, but the side poses are different in the comparison round.
Side Pose
From your front pose, you’ll do a quarter turn to the right:
- Stand straight, with both legs together and facing the same direction, holding your legs and your glutes high and tight.
- Keep your shoulders down and back.
- Move your left shoulder back a few inches.
- Don’t twist at the waist, but in moving your shoulder back, your other shoulder will come forward.
- Keep both arms and hands straight down.
- Keep your arm closest to the judges in line with your body, not extended behind you. I try to make sure my finger is lightly grazing my thigh so I know it’s in line.
- When you move into this pose, stand for a second facing straight forward, then imagine someone coming along and pushing your left shoulder back a few inches. This will help you get the right frame for the pose.
From here, you’ll quarter turn to the right into a back pose, then into your other side pose. Then you’ll face front again and hit your front pose.
Practice this, because you may be called upon to hit these poses repeatedly on stage. Sometimes you’ll only do it a few times. Other times, depending on how many comparisons they want to make, you’ll pose more. Once you’re done here, do your curtsy and wave, then head back to the side and hold your pose again.
Here’s a quick look at me walking through the whole process:
There’s a lot to think about here, and I obviously need to keep practicing. The only real way to get it down and get better is to keep at it. Hit the poses, remember to hold everything tight, and figure out small moves and tweaks that show off your particular musculature. Don’t forget to smile and make it look like it’s effortless, even when it’s not. I know it’s hard not to stress about it, but with time, you’ll feel better and start to put everything together.
And don’t worry, you won’t have to navigate any cats on the actual stage!
I hope this helps you in some way if you’re preparing, too. And I still have a couple of weeks left until I go in front of the judges, so, please, if you have any tips or tricks that you’d be willing to share with me and others, feel free to do so in the comments section.
My next post will be the last one before I get on stage. I’ll share with you what my final week—peak week—looks like in terms of diet and training, and my plans for show day.
Have a great week, everyone.


Recent Comments